How to make multiplication, factors, multiples, prime and composite numbers fun!

Tags
The Stage 3 (grades 5 and 6) number and place value curriculum is huge! There’s so much to cover. Understanding the concepts and mastering these skills are so beneficial for future mathematical content and most importantly, being able to apply these skills to the events that occur in everyday life. Rather than going back to the traditional methods I’m sure most of us were taught, such as using pen and paper and a whole lot of rote learning, why not open your learners up to a more stimulating experience where they can be present, excited and immersed in mathematical content? Let’s explore some ideas for teaching factors, multiples, prime and composite numbers and multi digit multiplication using CONNETIX.
A multiple is a whole number that can be divided equally by a smaller number, without a remainder. Factors are used to divide a large number where the answer results in a whole number and there are no remainders. Put simply, factors are the multiplying numbers and a multiple is the answer. For example, the multiple 12 has the factors 1, 2, 3, 4, 6 and 12. This concept is linked to multiplication and division fact families, critical for the use in daily events such as budgeting.
Factor trees are a visual way to see all the factors for a single multiple. The multiple sits at the top and its factors branch off like a tree below it. If the multiple is 30, we can write this on a tile and it sits at the top of our tree. Then below it we can list all its factors on their own tiles, these being 1, 2, 3, 5, 6, 10, 15 and 30. A great way to have kids understand this concept is to link it back to their multiplication and division facts. Some kids might need a little extra hands on help so ask them to take 30 tiles and find as many ways as possible to group them into equal amounts. Hopefully they'll see that they can make one group of 30 or 30 groups of one, two groups of 15 or 15 groups of two and so on. Then using this information they can create their own factor tree.

You'll need two players for this one! Create a 5×6 grid with your tiles and write each digit from 1-30 in each, you only need one board between you both. Player one chooses a number which is added to their score. Player two then circles and writes down all the factors for player one's number. All these numbers become part of player two's score. Now repeat the process with player two choosing a multiple for player one to find its factors. After all the multiples have been chosen and their factors have been found, each player needs to add their total. The person with the highest total wins!
Prime numbers can only be multiplied by one and themselves, meaning they only have two factors. A composite number is a positive, whole number that has more than two factors.
It’s so important to have learners clearly explain what makes the number a prime or composite number using mathematical language. With a solid understanding of factors, multiples, prime and composite numbers learners can connect their importance to multiplication and division.
Both strategies might seem tricky at first but with some practice they become quite easy and in my experience most children prefer one of these over vertical multiplication.

Shahnee is a primary school teacher who has a passion for supporting children to develop core literary and numeracy skills. She believes in creating a love for learning and fostering children's inquisitive, creative nature. She loves open ended play and believes it brings out everyone's inner child.

To explore these concepts, you might like to continue on from ‘the factor game’ mentioned above and discuss why some numbers haven't been chosen to be a multiple, such as 7 or 13. These numbers can clearly be seen on the CONNETIX game board because they won't have been circled. Composite numbers will also be seen easily as the multiples chosen will have more than two factors on the scoreboard.

Option 1: give your learners a range of numbers and ask them to prove which numbers are and aren’t prime numbers. Children can take the amount of CONNETIX needed and share them as many ways as possible.
Option 2: another engaging idea is to ask them to find all the prime numbers below 30. Using their square CONNETIX, have them create as many rectangles as possible to prove which are and aren't prime numbers. For example, when creating a rectangle with 3 or 13 tiles they will be able to visualise that it can only be made by 1 row. Hence, it is a prime number. In comparison, when making a rectangle with 6 or 15 tiles they will discover that it can be made in multiple ways. Therefore it's not a prime number, but rather a composite number. This allows students to understand how prime and composite numbers are created.

When multiplying larger numbers by one, two or even three digits, we can use some different strategies to help us solve the equation. Most of us would have been exposed to vertical multiplication but may not have heard about the lattice method or the area/box method. I wish someone had taught me these earlier because they make so much more sense to me! Let me explain.

Let’s use the example 2×34. Place two tiles down next to each other horizontally, this is where we will write our answers. Now, add 3 tiles around the outside of the two you first put down, two above and one on the left. This is where you will write the numbers that need to be multiplied. In the very left tile write the digit 2, in the two top digits is where we will place the 34. The first of these boxes will be written as 30 because the 3 here represents 3 tens, the second box will have the digit 4. Now we multiply the numbers that correspond with each tile (or box). So we multiply 2×30 and write the answer 60 in the square, then multiply 2×4 which is 8 and write this on its tile. Next we add these two answers together, 60+8=68. This can be written down on a large tile or you could take these two tiles and stack them on top of each other like a vertical addition sum, just make sure the place value columns line up. Then solve it this way. And that’s it!
Now, if we make the equation a 2×2 digit, we simply need to add another row below the one we already started with. For example 23×34 would have 20 in the first far left box, 3 in the second far left box, 30 in the top first box and 4 in the top second box. Then repeat the process of multiplying each of the numbers that meet in each box, next add all four answers together. The process is the same regardless of how many digits are in the multiplication equation. In this method learners are exposed to the concept of how multiplication is really solved, by multiplying all the individual numbers according to their place value.

We will use the same example as before, 2×34. Set your tiles up in the same way as the area/box method. In the very left tile write the digit 2, in the first tile on the top write the digit 3 and in the next tile on the right write the digit 4. This is where the two methods begin to differ, we don’t need to use place value in the lattice method. We are just multiplying the individual digits. Next, we draw a diagonal line through each tile where our answers will be written. The left triangle of each box represents the tens place value column and the right triangle represents the ones place value column. Now we multiply 2×3=6, so in the right side of the box we write the digit 6, there are 0 tens so we could write 0 on the left or leave it blank. Next multiply 2×4=8 and repeat the process. Now we add. Include two extra tiles in the bottom row and remove the original multiplying tiles with the digits 2, 3 and 4. We can also forget that we split our tiles into tens and ones as we will be adding just as we would in traditional vertical addition, from right to left. So we start on the right in the ones column and move across to the left each time. First we add 8 and nothing else, as there’s no other numbers to add. Write this on the tile below the 8. Next we move to the place value column to the left, the tens, and add all digits in this column, 0+6=6. Write the answer on the tile to the left of the 8. Then we repeat again, however in this example there’s nothing more to add. If we did have a three digit answer here we would have needed an extra tile to write this answer on in the final column. Now you can see the answer is 68 as well!

Again if we make the equation a 2×2 digit, we simply need to add another row below the one we already started with and draw in the diagonal lines. For example 23×34 would have 2 in the first far left box, 3 in the second far left box, 3 in the first top box and 4 in the second top box. Remember, we aren’t using place value for this method. Then repeat the process of multiplying each of the numbers that meet in each box, writing the tens digit on the left triangle of the tile and the ones digit in the right triangle. Include the extra tiles at the bottom and, if you want, remove the original multiplying tiles with the digits 2, 3 and 4. Then add all the digits together that fall in the same diagonal column, starting from the right as vertical addition does. As you can see you will need to carry a ten over to the next place value column when moving from the tens to hundreds, you do this just as you normally would with vertical addition. Regardless of how many digits are in the multiplication equation, the process is the same.
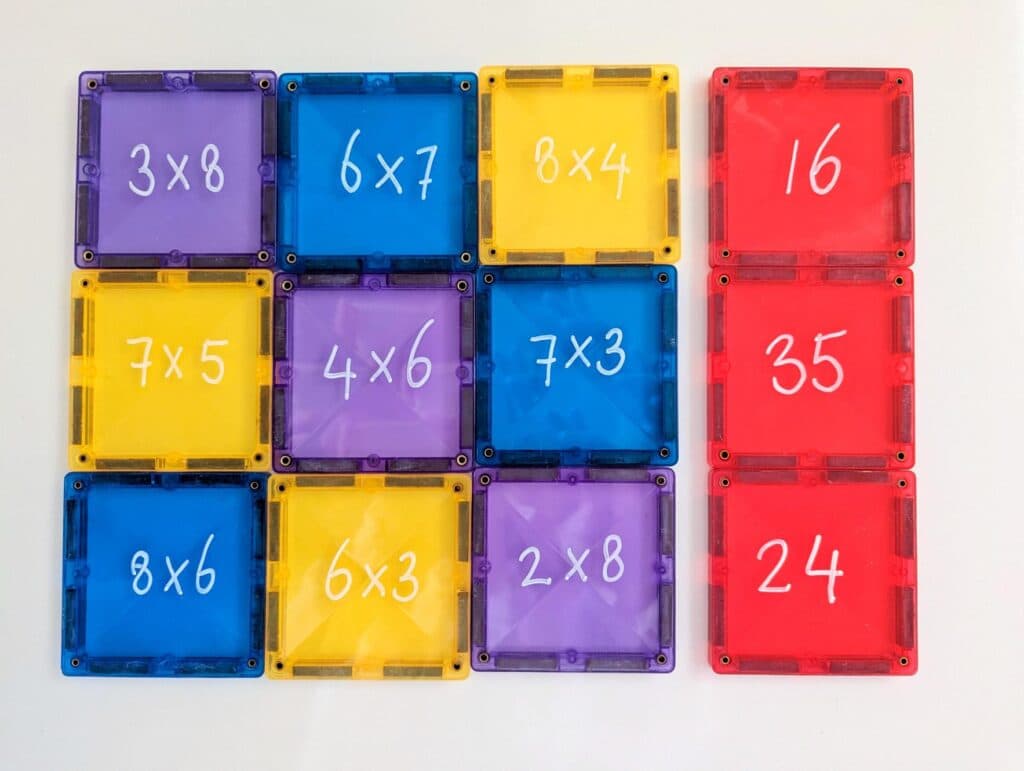

If your learners are still practicing their multiplication facts to help them solve larger multiplication equations, a game like tic tac toe might be fun. Have them identify which times tables they need more practice with, for example it might be the 6, 7 and 8 times tables. Ask students to create a 3×3 grid with their CONNETIX and choose 9 equations from these to write in. For example, 3×8, 6×7 etc. Then write all the answers for these times tables on a new tile and create a stack. Flip the top tile over, read it and if the child has the multiplication equation that matches they can cross it off their board.
Happy exploring!
Menu
 Australia